Installing Oracle Instant Client and Toad in Windows Operating System
- Alperen ÜLKÜ

- 11 Ara 2021
- 3 dakikada okunur

Hi dear friends, we’ve wrote about installing Linux on a virtual server and installing an Oracle database in our previous posts. In this writing, we’re going to explain how to install Oracle Instant Client and Toad editor in order to connect to an Oracle database and then ways of connecting to database with Toad.
1- Installing Oracle Instant Client
An Oracle Client Software is absolutely needed to be installed in the server which will connect so that application or developers can connect to Oracle database. Oracle suggests using client versions which aren’t older than the database version to be connected. The probability of encountering faults in connections increases when old client versions are still used in newer database versions.
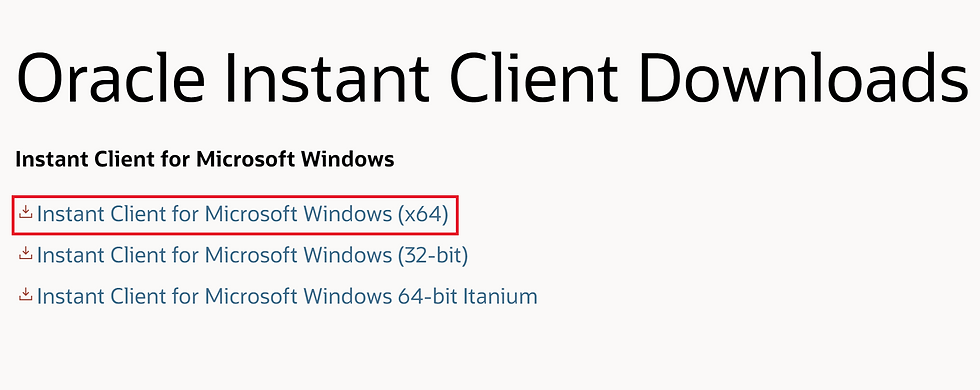
Click on the Windows version which is compatible with your server here. I choose “Instant Client For Microsoft Windows (x64)”.
There are many client versions that are compatible with Oracle database version. Choose “Basic Light Package” of the version which is compatible with yours. I continue to installing by choosing client version 19.13.

Upon clicking the link, unzip the downloaded ZIP file on the chosen location.

Now, you need to arrange environment variables. Write “environment variables” in the search bar.

Click “Advanced > Environment Variables…” on the opening tab.

Up half of the below tab is valid for only this user but down half is for all users. Choose Path for this user and click “Edit”.

Click “New” and enter path of the client file you’ve extracted. Then, click “Move Up” and you should get the image below. This is the end of the phases needed for installing Oracle Client.

2- Installing Toad Editor
“Toad for Oracle” is a highly preferred licensed software by Oracle developers and DBAs due to its practical use. We’re going to write about Toad use for DBAs in detail. You can download a current version of Toad here.
Run the setup file as Administrator and continue installing as below.

Accept the Agreement.

Add your license.

Select the other products you want to install.

Select the installation path.

Upon approving that you pass all prerequisites, click “Install” and start installing. At this phase, you may also see whether the client you installed is successful or not.

Installation continues...

Click “Finish” and successfully complete installing Toad.

3- Ways of Connecting to Oracle Database with Toad
To test ways of connecting to database with Toad, start the database and listener. You can do that as in the 4-EXTRA part of our post Installing Oracle 19c Single Instance Database.
Initialize Toad.

We’re going to show you the direct connection way with IP/Port as the first way. Enter IP and Port information of the database server. If you didn’t determine a specific value for Port information in the database installation phase, default Port of Oracle is 1521. Upon entering Service Name or SID information, you can sign in by clicking “Connect”. You may choose the client to be used for connection from “Installed Clients”.

Another form of the first way is connecting with the hostname information. You may connect with the hostname information you’ve entered in the “/etc/hosts” file in the database server.

As the second way, to connect with TNS, you should define a “tnsnames.ora” file.
Create a tnsnames file like the “$ORACLE_HOME/network/admin/tnsnames.ora” file present in your database server in the index you’ve installed the client. In this file, you may enter the analysable hostname or IP information where says “HOST”.


Click Environment Variables and then click “New”.

Define a variable called TNS_ADMIN and enter the path in which you put the tnsnames file as the variable value.

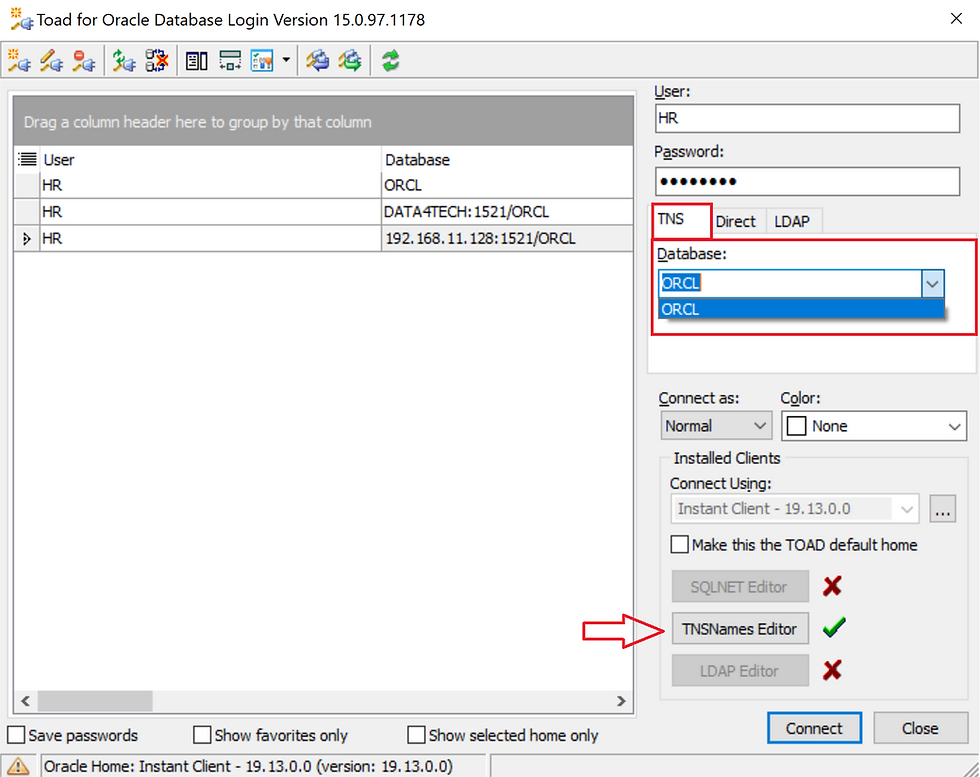
Go back to Toad and select TNS tab. You will see the name of the service you’ve added below “Database”, choose your service, click “Connect and then you can connect successfully. Click “TNSNames Editor” and then you can make changes such as add or drop in the tnsnames.ora file you’ve defined.
There is the third way, LDAP, but we won’t explain it in this writing.
Database connection is installed with Toad as in the picture below. Now, you can do what you want on the database in accordance with the authorizations of that user you’ve logged in with.

This is how our post, which explains the steps from installing Oracle Client to connecting with Toad, ends.
Hope to see you in new posts,
Take care.